skip to main |
skip to sidebar


 Join the fun at the snack table at all the weekend football game gatherings.
It is easy to have low calorie snacks that are also filling and nutritious!
Bring your own creations if you aren't the host--endless raw veggies without fattening dips you don't want to eat get pretty tiresome.
We remind readers that we have covered the sports snack topic before--please click back on July 5, 2010 for "Poor Man's Caviar", April 7, 2010 for "Oven Roasted Tofu", and February 6, 2010 for Michael's "Gazpacho" served in cocktail glasses. Most of these are fine just as they are, but for those of us watching our points and calories, today's post has some easy modifications. Mostly we omit the fats and oils and add some good seasonings.
Hummous Spread or Dip
Make with sesame oil and no sesame butter (tahini) to create a satisfying raw vegetable dip or crisp celery stuffing. It can be spread on crackers or scooped up with chips or strips if desired.
Place in the food processor (or heavy duty blender):
1 16 oz. can rinsed and drained garbanzo beans or 2 cups cooked ( 3 points per half cup)
2 cloves peeled fresh garlic (more if you love garlic)
2 Tablespoons sesame oil (1 point per teaspoon)
juice of 2 lemons
Pulse until creamy. If a little too coarse, add a tablespoon or two or water, stock or cooking liquid (if you cooked your own garbanzos). Pulse again and taste for salt. I also add ground white pepper and a teaspoon of smoky Paprika OR 1/4 teaspoon Chipotle ground chili or other smoky chili powder. Season to your taste. None add calories. Enjoy on crisp celery.
Yield about 2 cups or 18 points total. 1/4 cup serving = 2.5 points
Black Bean & Corn Salsa
Mix salsa in a 1 quart size container that will go right into the refrigerator. Eat a half cup often! It's very satisfying and helps keep us away from the cheesy snacks.
1 16-oz. can sweet corn (6 points)
1 16-oz. can black beans (6 points)
1 16-oz. can green beans (optional)
2 large cloves (or more) fresh garlic, split lengthwise and crushed
Juice of a lime (or substitute lemon)
1 cup good quality tomato juice OR 1/2 cup chopped canned tomatoes OR 2 whole fresh tomatoes, chopped, if they are in season
salt and pepper to taste
1 teaspoon ground cumin (optional, but very good)
chili powder or red chili flakes if heat is desired (optional)
Yield 4 cups salsa. Serving of 1 cup = 3 points (this is oil free)
Serve with an ounce of baked tortilla chips, or serve in a lettuce cup nestled inside a low cal whole wheat pita.
For those who will want a warm-up on a cold winter day--try this chowder served in a mug:
Manhattan (Red) Clam Chowder
Ingredients:
2 cups drained canned clams (1/2 cup clams = 2 points)
2 cups reserved clam juice
4 cups chicken or vegetable stock (de-fatted by chilling first if necessary)
1/2 cup tomato puree OR a can of tomatoes without seasoning OR fresh
1 large yellow or white onion, diced
3 Yukon gold (or any waxy potato) potatoes, cubed (3 oz. cooked potato = 2 points)
3 stalks celery, thinly sliced
1 teaspoon dry thyme or 2 sprigs fresh (traditional)
OR 1 teaspoon dry oregano or 2 sprigs fresh (variation)
2 bay leaves
salt, pepper
1 large clove garlic, pressed (optional)
1 teaspoon smoked Paprika (optional)
1/4 teaspoon Chipotle chili powder (optional, but very good)
Procedure:
Bring a quart of stock to a boil with bay leaves and add cubed potatoes. Simmer 10 minutes or until potatoes are just cooked. Lift potatoes out with a slotted spoon and set aside (so they don't overcook and fall apart).
Microwave diced onion in a shallow container with dusting of thyme or oregano. Add 2 tablespoons water, cover tightly with plastic wrap or a glass lid, and nuke for 3 minutes. See posting February 14, 2010 for no-fat microwave vegetable prep). When done, add to stock. They should be cooked and transparent, not browned.
Add the chopped celery and tomato puree to the stock. Simmer until celery is soft.
Just before serving, add back the cooked potatoes and bring to a boil. Add chopped clams, cover pot, and immediately turn off the heat. Canned clams are already cooked, so they just need heat. Let them rest with the stock and vegetables for at least 10 minutes, or up to 30 minutes to absorb flavors.
Serve in heated mugs (or bowls if guests have a place to sit) and offer chips or plain crackers or crusty rolls.
Yield about 2 quarts chowder. 1 cup serving = 4 points.
And may the best teams win........
KGC
 Welcome back!
Best wishes for a healthful, successful and peaceful New Year.
The second week of January is already upon us. Time flies.
Disclosure: I'm starting my fourth month of attending Weight Watchers. What's this? I have a modest goal that I want to reach by summer. It is often said that the last 20 pounds is the hardest to lose. True. True. True. That's where I remain as of January 8, 2011.
So, what to do? The KitchenGardenCook blog will keep focus on cooking locally and from the garden wherever possible. However it's winter in the heartland and we are under "no-grow" conditions until at least May. Unless you have a greenhouse, of course.
When my family moved to Montana from the California Bay Area in 1994, we determined to create a personal yard landscape that used native plants, but plants that created a coastal, semi- Mediterranean look. Russian Sage for Lavender, varieties of grapes that survive freezing temperatures, many evergreens and grasses, perennial herbs that could live indoors when necessary and so forth. We have been satisfied with the results.
Is it now time to consider modifying our cooking to fit with some of the Weight Watchers' ideals? The WW program is designed with a lot of flexibility--those who want packaged convenience foods can buy them, and those who don't (me) can make their own. You have to calculate "points" but it's easy with the new WW calculator. I still eat too much, even if what I eat is the "right stuff." WW advantage for me is obvious--almost all the fresh fruits and vegetables I want are included at low cost (WWpoints). The all-protein or its opposite, low- or no-fat schemes never worked for me. A combination of both works better, and science has proved it. Testimonials in the weekly group therapy sessions seem to support this. And there are more bodies in the door every week-- let's buy stock....
My weakness is bread and pasta. I come from a family of bakers. And pasta makers. These lovely items can be incorporated into the WW plan, if honestly counted. When I indulge, I have to eliminate the other carbs that day. Commercially processed packaged foods have no appeal for me--never did eat chips or other "sports" snacks or frozen entrees. I've made friends with only one "fake" product so far--diet mayo. Mixed with tuna or chicken it works from my mid-day protein salad. The fantastic calorie difference makes it well worth it.
OKAY--shall we continue on this direction? Please "weigh" in. I want to start converting my French cooking training (yes, Cordon Bleu, Paris 1984) into techniques and recipes that will be gorgeous to look at, great tasting, and more healthful.
Stay tuned!
Kitchen Garden Cook


 We received two 5-gallon buckets brimming with local apples. I don't know what specific variety they are--maybe you will recognize them from the pictures. The fruit is bright red with firm white juicy flesh. They have a fine flavor for eating out of hand. Such an apple is ideal for the juice technique posting today.
A dear lady from Toulouse, France, married to a noted regional artist and sheep rancher who passed away in 2004, shared this juice extraction process with me some years ago. Her orchard produced a Golden Delicious variety, prolific and hardy in our cold zone. The fruit was clear yellow in color, highly aromatic, crisp, and excellent for eating raw or cooking. I remember sitting in the shade on their lawn on hot summer days and drinking a pitcher of her apple juice over ice--as clear and pale as the rarest Champagne. I have made it each fall ever since--to preserve that memory of summer again and again.
Most any local apple will do--however, if the fruit is sweet enough to enjoy raw, you will not have to add much sugar, if any. This makes the result even more attractive to those of us who watch our sugar calorie intake. RED skinned apples make a lovely pink color--a non alcohol rose.
Our apples required quite a bit of trimming---many were windfalls, and the birds and squirrels had discovered a treat. After thoroughly washing them with the garden hose, I set up a simple work station in the yard and split the apples and trimmed away any bitten or bruised spots.
Two brimming pails of whole apples produced two about 2/3 full pails of apple pieces. (See photos).
The technique we are using is basically soaking split or quartered apples, not peeled, not cored, with a solution of cream of tartar powder and boiling water. That's it. The apples are weighted down in their buckets after covering them with boiling water, and left to soak 24 hours. After that period of time, the juice is strained off, reboiled, sweetened if necessary, and processed in Mason jars. Please see posting on processing grape juice September 18, 2010.
Basic Proportions for Apple Juice
(easily doubled or tripled if you have space)
3 quarts apples, halved or quartered depending on size (don't bother to core)
5 quarts boiling water
1 tablespoon cream of tartar
Scrub apples, trim, and place in a scrupulously clean bucket, large kettle or steel basin.
Sprinkle cream of tarter over pieces. For each bucket pictured, I used 2 tablespoons cream of tartar each.
Pour boiling water over apples, agitate slightly to dissolve powder. Weigh apples down to keep them covered with solution. Use a heavy plate that will fit in the bucket and set another weight on top -- see photo -- a glass baking dish is added for a little extra weight. Cover pails with a lid or plastic cutting board to retain some of the warmth and keep it all clean.
Let stand 24 hours.
Strain the apples through a colander lined with cheesecloth or a thin wet dish towel. Catch juice in another basin or stock pot. Discard apple pieces.
Bring juice to a rolling boil and simmer at least 20 minutes to kill any bacteria or yeasts. Taste juice. If you want sweeter juice, start with one half cup of sugar and taste again before adding more. Bring to a boil again to completely dissolve sugar. If you desire more intense apple flavor, continue to boil and reduce quantity of juice 10 - 15%.
Have jars ready-- sterilized and hot. Fill and top with new lids. When sealed, wipe off any sticky on the jars and store them in a cool dark place.
Enjoy!
KGC
 Well, I forgot the most important picture connected with the previous Farmers Market post. Here is the Beet Salad from
Il Fornaio in Marin County, Calif. It was made with two colors of beets---reds and golds.
Delicious.


 The summer turns to autumn abruptly in the northern plains. Suddenly one night it's 38 degrees instead of 60, and you begin to think about frost harming your little back yard patch of tomatoes and string beans. To cover them or not? It's always the question.
The local farmers market extends the season --- last week there were still plenty of root vegetables, late blooming flowers (mostly yarrow), and the last of corn on the cob. I went to buy beets at our farmers market to recreate a composed salad served to me in San Francisco last month. I couldn't wait until next year. It had to be now and my little row of backyard beets failed to get larger than marbles.. I purchased two big bunches of beauties that were in my kettle within the hour, boiled, peeled, and sliced for my salad (see recipe below).
The San Francisco Farmers Market is more year-around, since California's climate is Mediterranean mild. A few pictures show some of its glory. We stayed for a week across the street from the Ferry Building Plaza, which hosts the market on Saturday mornings. It was more than pleasant to enjoy our morning coffees and pastry on the wharf with all the activity a few feet away. I bought figs and raspberries and ate them right out of the basket.
My interest in fresh home grown produce stems from a childhood spent near farms--not my own, but the farms of many relatives. Neighbors still kept dairy cows well into the 1950s. Our contemporary notion of "localism" was a fact of life then. Hundreds of items we take for granted today were special treats and highly seasonal until the advent of the jet plane. We lately lament the demise of the "family farm" and yearn for its return -- perhaps in our own neighborhood or the school yard, where vegetable gardens have sprouted next to the playground. But of course it is unrealistic to think that our world of over 6 billion souls could be fed locally--there simply would not be enough even if all had their own garden. In the developed countries, we take for granted dozens of kinds of coffee or tea, cinnamon, saffron, cardamom and myriad exotic spices, citrus, peaches, melons, fresh ocean fish, shellfish, and every kind of manufactured food product, every day of the year. Surely it is a fantasy that we use local products for more than a percentage or two of our diets. Still, it is important to know how we grow our food and how much we spend on resources to ship it around the world. One day we may have to adjust to far less variety--and who knows? It might not be as inconvenient as we think.
Meanwhile, let's do what we can to focus on local produce, and take advantage of it. It will always be the freshest. We have previously posted articles about cherries, grapes, and apples that are in over supply around home. Our farmers markets will end soon, but let's give those who offer their beautiful wares our support.
Composed Italian style salad featuring Beets
Prepare a bunch of approximately 4 - 6 fresh beets by trimming stems (greens) leaving about one inch of stem. Wash well to remove any loose soil. Cover with water in a sauce pan and bring to a boil. Simmer gently for about 30 minutes, depending on size. You should be able to pierce them with a fork (like a properly boiled potato). Drain and cool enough so that you can slip off the outer skins. Set aside until ready to slice and use in your salad.
*Don't waste the beet greens--steam them in a basket over boiling water, and toss with olive oil and red wine vinegar. They are an addictive variation on chard and spinach.
Prepare a vinaigrette style dressing (see February 1, 2010, for basic recipe) with olive oil, salt, ground pepper, and substituting lemon or lime for the acidic proportion (rather than vinegar).
Toast some walnut halves in the oven (spread on a cooky sheet or pie pan, toss with salt, and roast at 325 F for about ten minutes.) As soon as you are able to smell the aroma, they are done. Remove from oven and let cool.
Prepare some salad greens--about 1 cup per person. Greens can be thinly shredded head of Romaine, or "Mesclun" or "spring mix" baby lettuces from the garden or market.
Shave some Parmesan cheese with your vegetable peeler, or used grated if preferred.
Final assembly: Slice beets (about one quarter inch thick) and toss with some dressing. Toss greens with some dressing and pile on a salad plate. Next lay on sliced beets and handful of toasted walnuts. Finish with shaved Parmesan and serve.
Option: this same salad preparation can also be made with fall pears--no need to cook the pears.
Reminder: take another look at the posting on July 5, 2010, with the Yukon Gold potato salad, and the Succotash salad using harvest beans, corn, onions, and garlic. Delicious again!




 Continuing with our focus on the bounty of fall fruits right in the neighborhood, we picked grapes last weekend and canned the lovely juice. The grapes are so sweet this year that adding sugar is not necessary. It was a social event to pick them on a hot September afternoon.
Lovely jelly can also be made from the grape juice and if you are interested in jelly, please refer to your county extension service or the instruction inserts in fruit pectin packages sold in the canning supplies aisle at your market. Cookbooks such as "Joy of Cooking" also give detailed steps for canning and preserving many kinds of fruits. Most of us do not have the time or fresh produce to "put up" our winter supplies--it's far more practical to buy them already done. However, the abundance of fruits available for the picking always tempts me to do it once more.
If sweet apples become available soon, I will post making juice in a French technique taught to me by a French rancher in our area. Stay tuned.
GRAPE JUICE
First: arrive at the arbor with your clippers, 5-gallon pails, and a sturdy ladder. After filling your pails, store in a cool place (away from birds and raccoons), overnight if necessary.
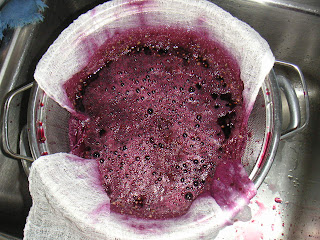
Prepare your kitchen canning station. You will need a large colander or wire strainer, your biggest stock pot or kettle, something to crush grapes as they cook -- a potato masher works well-- cheese cloth or thin pieces of worn cotton cloth to line the straining colander, and another basin or large pot to catch juice as you strain the seeds and stems. Mitten style pot holders and large spoons are also necessary. Once the cooking down process starts, you won't want to be searching for gear.
Second: thoroughly wash grapes under running cold water to remove any dirt, little insects, etc., This may be done outside with the garden hose if your sink is small. It is not necessary to remove grapes from stems. Wine grape harvesters crush everything at once, remember.
Third: fill your stock pot(s) about 2/3 full with washed grapes. Cover with cold water (maybe over- cover an inch or so), and bring to a boil. Once boiling, reduce heat and simmer for about 30 minutes. I use a large commercial potato masher a couple of times while cooking to release more juice. When cooked, turn off heat, cover pots and let cool until juice can be safely handled. I usually cook the first day after picking, cover, and let sit overnight.
Fourth: when cooled, carefully pour juice through a colander or wire basket lined with a couple layers of cheese cloth (rinse the cheese cloth before use to remove sizing--it might leave a little taste that you don't want) and catch it in a basin. Rinse the cooking pot and return the juice to it for further boiling. Lift the stems and seeds caught in the cheese cloth and squeeze out all the extra. Discard stems and seeds and reline colander if you have more batches. I don't reuse the cheese cloth, but you may. .
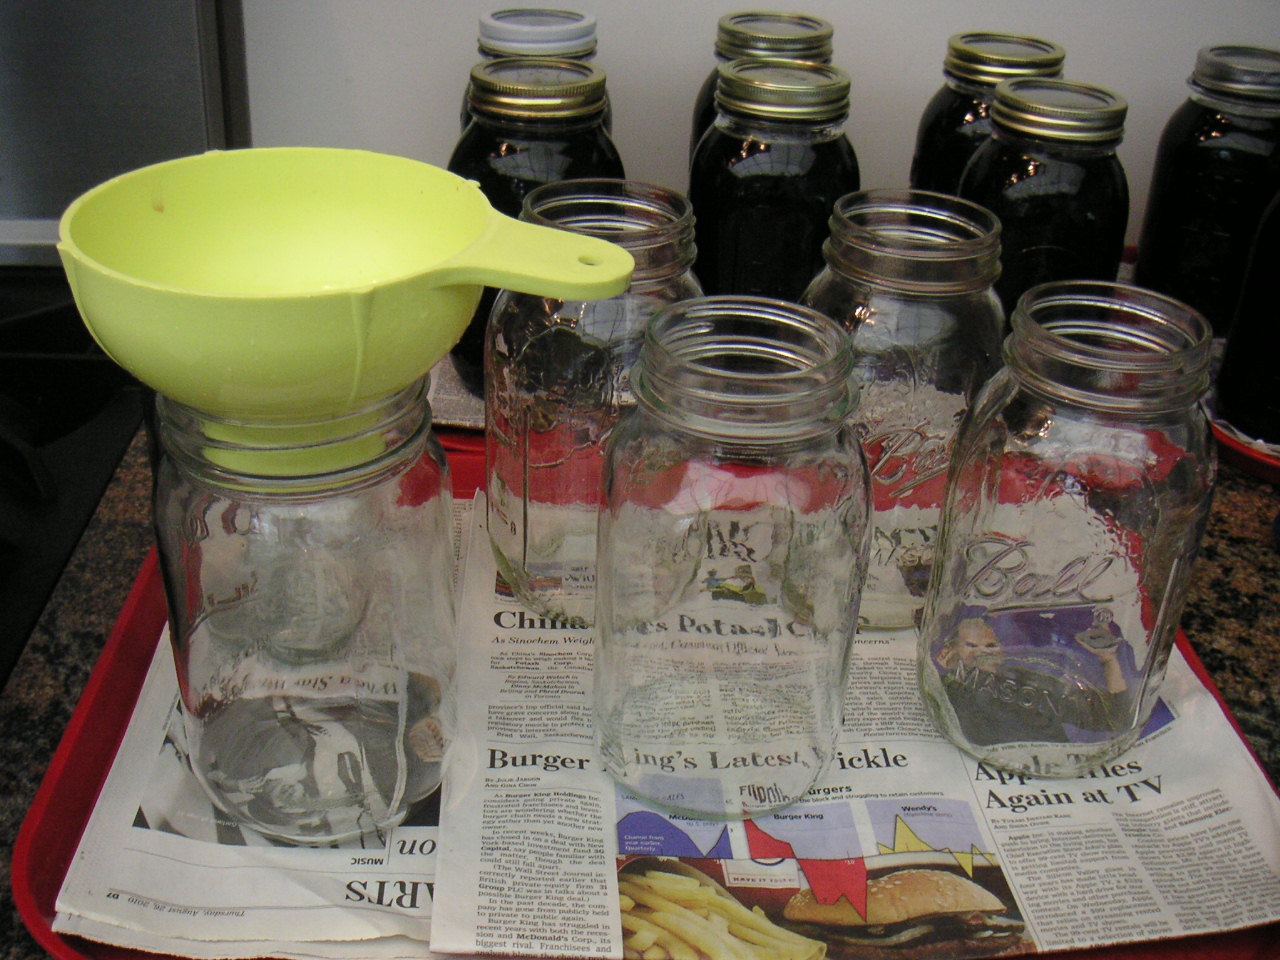
Jar Preparation: I wash my "Mason" style* quart canning jars in the dishwasher and immediately set them on a tray and put them in the oven at 225 degrees F to stay hot until filling with juice. Jars must be scrupulously clean and HOT for canning process.
Prepare lids by heating in a small pan of water and keeping them hot. If you are reusing your rings, be sure they are washed and clean. Use tongs to lift out lids.
Fifth: Boil the strained juice for 10 minutes and fill jars. Before finishing the boiling, taste the juice. If you desire a more intense taste, continue to boil and reduce (excess water evaporates and you get greater flavor). If you desire sweeter juice, start with adding 1 cup of granulated sugar to the pot for each 4 quarts juice. Bring to a boil again and be sure sugar is completely dissolved. Our Concords, Betas (reds), and Briannes (whites) rarely need to be sweetened. You can always sweeten the juice later when you serve the juice.
Please refer to reliable reference material for filling and sealing jars. This step is extremely important for food safety. There is little risk in canning fruit juice, but nevertheless, shortcuts should not be taken.
Sixth: Using a wide funnel and a pint glass measuring cup, fill 3 jars at a time. With a scrupulously clean dishcloth, wipe rim of each jar (dip it in the hot water you are holding for the lids) and top with a lid. Screw on a ring and set jar aside until you hear the pop of its seal. Because I use oven hot sterilized jars, hot lids, and boiling juice, I do not additionally process. Follow your equipment and manufacturer's recommendations. Repeat process until all hot juice is used. If you have juice left over, but not enough for a full jar, put it in a glass or pitcher and refrigerate and enjoy soon!
Final step: Check lids for sealing--if a lid has flexibility in its "dome" when pressed with your finger, it is not sealed. Refrigerate and use as you would a refrigerated juice. For sealed jars, wipe jars to remove any stickiness and store in a cool place (wine cellars ideal).
*The "Mason" glass canning jar was invented and patented in 1858. Jars feature a 2-part cover: an inner flat metal lid and a screw-on ring which holds the lid in place. The canning process creates a partial vacuum as the juice cools, and seals jars until opened later. The sealing lids are used ONCE. The glass jars can be reused many times, making them an ideal container for those who like re-usables and recyclables.