skip to main |
skip to sidebar

 We have a wonderful neighbor with cherry trees. Cherries make delicious summer treats!
Please go to this blog archive and click on August 24, 2010, for a picture of the tree (and more recipes).
This year the cherries that were shared with us went into the jam pot--same great flavor without making crust.....
Jam is almost foolproof. It doesn't have to "jell" like jelly. Any summer berry or soft fruit will do, but we are working with cherries today because they were just acquired locally.
Procedure
Review canning procedures as per instructions on packages of lids, rings, and pectins, or in a reliable cook book.
Prepare small jars (one cup size (8 ounces) is my favorite, but pint jars OK) by standard sterilization for canning procedures. Boil clean jars in water to cover for at least 3 minutes. Remove and drain on a clean dish towel (on a tray for added convenience) and drop NEW lids and rings in the hot water until ready to use. Rings can be re-used. Jam mixture and jars must be HOT to get a proper seal.
The French make fruit jams when fruit is at its peak. This is ideal---don't waste the sugar or your precious time if the ingredients are not fully ripe. In fact, I have purchased baskets of apricots about to be discarded at fruit stands that were overripe for eating out of hand. They were my most delicious result.
I like the French "confiture" method, which simply takes equal amounts of fruit and sugar (cup for cup) and macerates (soaks) them in a glass or ceramic pan overnight (12 hours). If you are doing a big batch (more than 4 cups fruit), alternate layers of fruit and sugar, ending on top with sugar.
Macerating draws out the juices. Cherries will soften and a thick syrup will form.
Start with 4 cups fruit and 4 cups real white granulated sugar. If fruit is exceptionally sour, add more sugar.
When time is up, drain cherries in a kitchen strainer over a heavy sauce pot. When thoroughly drained (press on them a bit if necessary to extract all juice possible), dump cherries onto a cutting board and chop coarsely (see photo).
Bring syrup to a simmer and cook about 7 minutes. Syrup should be clear. Add cherries and cook 8 - 10 minutes more.
Optional: If you want a thicker mix than cooking alone has made, add 1 packet of liquid pectin for about 4 cups jam (see pectin instructions for accurate proportion and stirring procedure. It's easy.)
Optional: If you don't have pectin or don't want to use it, be sure to cook "syrup" to the firm ball stage (239 - 244 F) and then add the fruit and continue cooking about 8 - 10 more minutes. It should be thick enough for use on toast, etc.
KGC


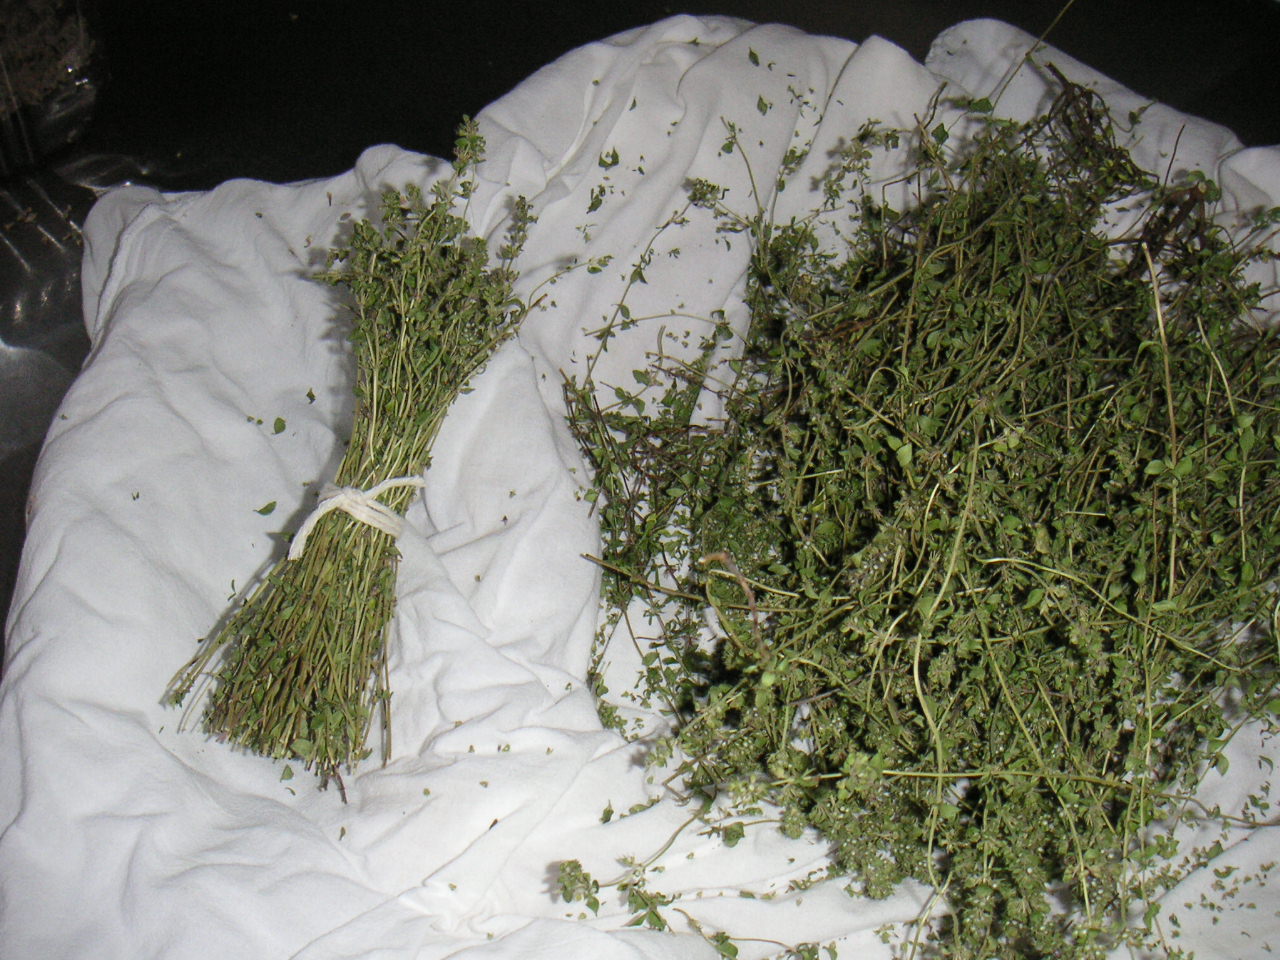
 Our shrub of thyme has flowered and was ready for harvest. The plant offers a lovely corner ground cover for the vegetable garden with its tiny blue violet flowers and then gives us a season's worth for cooking and gifts. Please refer to this blog's posting, January 24, 2010, for a more detailed primer on harvesting, drying and storing various herbs.
Common culinary thyme, THYMUS vulagris, has at least a thousand uses--from seasoning meat dishes, soups, stews, game bird rubs, pasta sauces, and so forth. Don't overlook the French trick of adding a scant tablespoon to your nut bar crusts or fruit pie crusts--a mysterious element that gets everyone's attention. Also try a vanilla ice or sorbet with thyme flowers. I fondly recall the gorgeous flavor at the multi-star restaurant in St. Paul de Vence (France) where we first tasted desserts with thyme--the icy sorbet with thyme on a hot day was a memorable finish to a most memorable lunch.
Procedure
Cut your herbs, leaving about 2 inches to regrow. Separate loosely and dry in a dust free place on a clean dishtowel out of direct sunlight.
When completely dry ( 3-10 days depending on your climate's humidity) select stems and bundle (see photo). Southern European cooks keep a bundle by the stove and rub the dry leaves right into the sauce pot.
If you don't want to bother with tying, rub the whole pile between the palms of your hands over parchment paper or other clean paper, discard the stems and collect the tiny leaves in glass bottles for storage. Label and date.
Either method creates great gifts if you have more than you need.
And the workspace smells heavenly....
KGC


 A bulb of garlic has been likened to a rose in bloom---restaurants have taken the name, and poems have been written. Who doesn't love this noble herb? Who ever has enough of it?
Genus Liliaceae. Family Allium. Many edibles are included in the family--garlic, chives, leeks, and various onions are commonly known, loved, and heavily used in cooking all over the world.
We have grown our own in Montana--they are the best imaginable--sweet, juicy, and no inner sprouting. But it's too early for our crop, so a bag of garlic was purchased for roasting chickens
and I set aside 7 extra heads to prepare this recipe.
Roasting garlic is one of the most satisfying things to do in the kitchen. You cannot have too much of the resulting delicious paste. It's a kitchen staple. The commercially processed paste in the grocery store is expensive and doesn't measure up for flavor. You will never use powdered garlic again.
Technique
Use a glass or ceramic oven proof dish with a lid if possible. No lid? Cover tightly with aluminum foil. The glass casserole pictured is "vintage" and allows you to see what's going on as it bakes in the oven. You can find these extremely useful Pyrex type baking dishes at the second hand store (or in your mother's cupboard--as I did).
Pre-heat the oven to 375 F. Use the middle rack.
See how many heads of garlic fill your dish. Then cut off the top quarter of the heads so they will open during cooking. DO NOT THROW the cuttings away! Save in a small custard cup or ramekin (see photo) and bake along with the main casserole. They take about half the time. As soon as you take them out of the oven, you will be sucking the little bits out of their peels and licking your fingers. This is the cook's treat while doing other tasks. Save the trimmings and press through a tea strainer and use the garlic flavored oil. ( I love wiping out the ramekin with a hard boiled egg. Yes!)
After trimming, replace heads in the baking dish, pour over about 1/4 cup good olive oil (or a little more) and salt and pepper the cut heads. I use white pepper because the garlic is white but black is fine if you don't mind the dark specks.
Cover tightly, place in the oven for 30 minutes. Remove dish from the oven, turn heads over with tongs or a spoon and roast another 15 minutes upside down, and then return to right side up for final 15 minutes. This reversal is an easy way to baste the cut ends and keep them from drying out. Optional. But well worth it.
A toothpick is a good tester for doneness--you want soft cloves because when cooled, you are going to grasp each head and squeeze the creamy garlic out for use. When done, the cloves also start to "pop up" and the edges look caramelized.
Heads keep about a week in the refrigerator if you don't plan to use them all at once.
To use, pick up a clove in your hand and squeeze the pastel into a small bowl, pressing out every drop. Add the baking oil from the bottom of the casserole and mix it in with a fork.
There are a million uses in addition to just squeezing the paste on crusty bread and eating.
Use straight for a sandwich spread, add the oil to make a dip, or mix with cream or tomato puree, or any vegetable puree, and make a pasta sauce. Another idea--paint it on your pizza dough before adding tomatoes and cheese. A divine secret ingredient. If your friends don't mind getting garlic on their fingers, set a plate of roast garlic on the buffet or cocktail table and let them squeeze their own....
KGC
Thanks to Michael Chiarello, the great chef at Tra Vigne in St. Helena, California, for the basis of this technique. We have enjoyed many many fabulous dishes at the restaurant which features seasonal specialties from the wine region.


 It's the height of the season to enjoy meals out of doors. But all those calories from hot dogs, BBQ sauces, rich meats, mayo laden potato salads, ice creams and giant cupcakes make one think twice.
Last night we made a QUICK "almost" burger with large Porcini mushroom caps (4 inchers). After a quick grilling with olive oil and garlic, we topped them with a scoop of Stonemill Kitchens spinach, artichoke, and Parmesan dip (from Costco), a thick slice of ripe tomato and some minced parsley. Delicious and less than 15 minutes start to finish. Easy to multiply by number of diners--just allow a Porcini mushroom for each serving. You or your guests will enjoy this treat while the kids and long distance runners can have the hamburgers.
Only 100 calories for 2 tablespoons of the commercial dip. Mushrooms and tomatoes are almost free, and about 1 tablespoon pure olive oil is 100 calories. Serve with iced tea or a glass of chilled wine, some summer fruits, and you're all set.
PORCINI "ALMOST" BURGER (FOR 2)
TWO cooking options: the outdoor grill or the kitchen oven broiler
In a small bowl, place 1 tablespoon olive oil (enough for 2 mushroom caps) and add a pressed large clove of fresh garlic (fresh always better, but powdered if you must). Mix.
Remove Porcini stem (save for stock) and scrape away black under gills with edge of a soup spoon. Optional, but I always do it because it looks better.
Paint both sides of the mushroom with the oil/garlic mix (use a brush, or your fingers) and place cap directly on the outdoor grill. Watch carefully, but plan on about 2 1/2 to 3 minutes per side.
If using kitchen broiler, place caps stem side up first on a foil lined baking sheet. Timing should be about the same, but it depends on how hot your broiler is. Turn and finish the top (dome) side.
Remove and place on a warmed plate, stem side up to hold filling. Top with about 2 tablespoons artichoke spinach dip (we used a small ice cream scoop to speed this along). Add a nice thick slice of tomato, some chopped parsley or basil, and serve with other fresh fruit or vegetable garnishes.
Variation: Substitute artichoke dip with hummus, add 1/4 teaspoon ground cumin to the olive oil, and continue with tomato, etc.
Variation for those who desire a few more calories: top mushroom first with a scoop of cooked rice (any color), then hummus or artichoke dip, tomato, etc.
The patio vegetable pots are doing great--see photos. The "dirt" veggie garden a bit slow due to our late cold spring. But it is nice and hot now (90s) and beans and tomatoes are catching up.
We are loaded with arugula--my favorite sandwich "lettuce". The perennial flowers have reached their mid-summer bloom. Peonies, flax, and iris gone, but shrub roses, daisies, day lilies, yarrow and malva huge.
Enjoy the weekend!
KGC


 Spring 2011 has been a long time coming. Our south central Montana region had 12 inches of rain in MAY, which is a record. Our average ANNUAL amount is around a mere 14 inches. The result is a very late start for planting in the fields as well as planting in the kitchen garden.
But hope "springs" eternal and we bravely set out 12 tomato plants yesterday and planted our chard and green been seeds. Stay tuned.
Perennials are the big beneficiaries of all this moisture. Peonies are robust, flax and poppies are in bloom, and the early bachelor buttons are blue. No asparagus! We haven't figured out what happened in our 15 year old bed. Rhubarb is lush with elephant ear sized leaves. So the obvious thing to do is use some of it.
Last season ( June 1, 2010, blog posting) we made rhubarb pie and demonstrated an easy food processor pie crust technique. Check it out for more detail on rhubarb handling. This season I'm watching calories, so will offer a healthier ingredient crisp instead. The additional benefit of "no crust" saves much time.
Prepare rhubarb first, then process topping. Preheat oven to 350 F.
FIRST STEP: FRUIT BASE for a 9" square baking dish of crisp
Place in a 2-quart bowl and toss well:
2 pounds rhubarb, washed, trimmed and sliced into 1/2 inch pieces
(approximately 6 cups of cut pieces--see photo)
Add 1 1/2 cups sugar ( white, brown, or combination of the two)
Add a scant 1/4 cup lemon or orange juice
Set aside while preparing topping for your crisp. The fruit and sugar will form a lovely syrup.
SECOND STEP: OATMEAL BASED TOPPING
Place in food processor (see photo):
1 cup old fashioned rolled oats
1/2 cup flour (white or whole grain)
1/2 cup brown sugar (best here, but white will do)
6 tablespoons cold butter, cut into pieces
1/4 teaspoon powdered vanilla (or 1 teaspoon liquid vanilla if you don't have powdered)
Options: Powdered ginger or powdered cinnamon may be substituted for vanilla.
Pulse until butter is evenly incorporated and the topping is a nice crumbly meal
THIRD STEP: Baking the crisp
Fill baking dish with the rhubarb mixture (see photo).
Cover fruit with oatmeal topping, handful at a time--spread evenly and pat lightly.
Place in 350 F oven and bake 45 minutes.
Remove, cool, and serve warm or room temperature
Those not counting calories or points or carbs, may desire to add cream or ice cream at service.


 The day has finally come---and we are celebrating with clear blue skies and 55 F degrees. This has lasted almost one week so we are confident that the Earth has turned. The pictures of the pruned Red Twig Dogwoods and Shrub Roses shows our work the past 3 days--time to prune back, remove dead wood, and cut away the old rose galls that plagues our shrub roses. They are easy to see before the branches sprout new leaves.
The peonies, of course, are what this spot will look like in about 45 days.
Seed catalogs are arriving daily--so much temptation! I will be planning my herbs soon--those not perennial will be started indoors or purchased from a licensed nursery in our area for setting out mid-May. It's too risky here to be more optimistic about frost. Mother's Day is the traditional date for lilacs and planting in the home garden. Stay tuned!
We will watch the finals of the Indian Wells (Palm Desert, California) Tennis tournament this afternoon and enjoy some quesadillas made with left overs from the week--EASY and delicious.
What you need:
A package of tortillas--I use a low-calorie wheat tortilla, but choose your favorite.
Chopped greens: Leftover spinach, Swiss chard, cilantro, fresh parsley, or whatever you have.
Use frozen if thawed first and squeezed dry. Leftover green beans, asparagus, and corn also work.
Grated cheese: Any grated cheese will do--a great way to use up leftover bits of cheese. If you want the gourmet touch, use goat cheese or feta with spinach and cilantro.
If you don't count calories, heat 1 tablespoon of oil in a skillet, add chopped vegetables, and heat for about 2 minutes. Season with salt, pepper, squeeze of garlic, and a pinch red pepper flakes (optional, but delicious). This mixture may be heated in the microwave without oil.
Choose your method of final cooking:
Skillet on top of the stove (non stick is good). Place tortilla in the pan, spread with the vegetable mixture, sprinkle with grated or crumbled cheese, top with a second tortilla and heat until cheese melts. This goes FAST. Watch carefully for melt, and then flip over to heat second tortilla. Cut into desired serving pieces and eat warm.
Option: For one, just heat it "open face" and fold over. Cut into thirds and enjoy.
Microwave Oven: Place tortilla on a serving plate and follow above method. Cover with vegetable mix, add cheese, nuke about 30 seconds--depending on strength of your microwave. If using a top tortilla, rather than just folding one over, removed, flip over, and give it another 30 seconds.
KGC


 "Pistou" actually means pounded basil. It translates into the more familiar example of pounded basil---our old favorite, pesto.
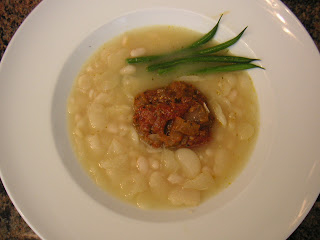
In the South of France, a luscious white bean soup base with spring vegetables is a very popular dish. The "pistou" or pesto is mounded in the soup bowl first, and the broth with beans is ladled around for an attractive service. At table, each guest mixes the parts together with a soup spoon and enjoys the dish with crusty bread, a simple wine, and perhaps a piece of seasonal fruit for dessert. We offered pears today.
There are resemblances to minestrone--a soup with a million variations, and often differentiated with colored beans (red). Please consider preparing the parts of this soup separately and combining just before service--nothing worse than re-cooked green vegetables.
The beans can be finished well ahead. The "pistou" can be finished well ahead. Your choice of fresh vegetables for color and garnish should be lightly cooked and added just before service.
Traditional pistou often includes bits of pasta (any small shape, or broken bits of spaghetti) or torn pieces of day-old bread. Your choice. Tradition also includes much more olive oil than this recipe, but we're counting calories--you'll never miss it.
Soupe Au Pistou
Bean base preparation: Soak overnight to reduce cooking time:
(Of course you may substitute canned beans if you wish--about 4 cans).
1# dried white broad (lima) or smaller white beans covered with several inches of water
2-3 bay leaves
Next day, drain soaking water, rinse beans well, and cover with fresh water (about 3 inches over the top of the beans). Add 2 teaspoons salt and 2 more Bay leaves and simmer on medium heat, partially covered, for about 1 hour or until beans are tender to bite. Test one. If it "bites" to your liking, remove pot from heat and set aside. A lovely stock forms magically from the beans themselves. You may add some chicken stock if you wish but it isn't necessary.
Pistou Preparation:
Place in a microwave-proof dish:
1 large onion diced
4 cloves garlic, pressed, or minced if you prefer (mince is smaller than dice)
1/4 cup water
Cover with glass lid, or plastic wrap and nuke on high for about 3 minutes. This microwave technique for onions or other aromatics (celery, carrots, leeks) eliminates the need for cooking oils. Drain off any excess water, and dump into a skillet.
Add 2 cans whole Roma style tomatoes, diced tomatoes, or fresh tomatoes if you have them. Don't buy the pre-seasoned cans of tomatoes--not authentic taste, and often include sugar. Break up whole tomatoes with a spoon.
Add 1-2 teaspoons salt (optional)
Add 1 teaspoon ground pepper
Add 1/4 cup commercial pesto (or make your own)*
Gently combine all ingredients.
Cook this mixture until it is reduced (15 minutes)--all water is evaporated. Ingredients remain recognizable, but more like a paste than a pasta sauce. Set aside until service. It continues to improve in flavor.
Select your additional green vegetables--fresh string beans are excellent, along with some shreds of green cabbage (available all year around). Match stick slices of carrot, zucchini, turnip, leek, even peas, are all good. Use what is in season---the white beans and "pistou" can be made from canned ingredients, but not the accompanying veggies.
See blog post February 14, 2010, for info on microwaving FRESH vegetables--including such delicate greens as asparagus and fresh green beans. Neat and quick.
Assembly for Service Presentation:
Reheat beans and their broth
Reheat the tomato/basil "Pistou"
Drain green beans or asparagus or whatever you are using for contrast garnish
Place a scoop of "Pistou" (about 1/3 cup) in the center of your soup bowl
Place the contrast veggie next to it (green beans today)
Carefully ladle the soup stock around the pistou.
Top with a tablespoon of grated Parmesan or other hard Italian type cheese
Serve with crusty rolls or baguettes.
KGC
*Pesto can be easily made in the processor. When we don't have fresh basil in winter, I buy it prepared at Costco. If all isn't used within about 10 days, divide into portions and freeze. Convenient.
Make your own if you have fresh basil:
Place 4 cups fresh basil leaves (clean, dry,loosely packed) in the food processor
Add 4 gloves peeled garlic and pulse a couple of times.
Add and pulse again:
1/3 cup toasted pine nuts
1/3 cup grated Parmesan or Romano cheese
1-2 teaspoons salt (optional--cheese may be salty enough) TASTE it.
Now with processor running, add about 1/2 cup olive oil in a thin stream.
It may not be necessary to use it all. Stop when it looks well incorporated and is the nice creamy texture you like.
There are many variations of the proportions of basil = garlic = oil = Parmesan. Experiment for your favorite. "Pesto" is now being made with other herbs such as parsley or cilantro. Delicious, but not really "pesto".

 There is a hint of spring in the air--at least the temperatures are above freezing and our driveway is clear for the first time in many weeks. The last golf game was played at our neighborhood club on November 17, 2010--a record spell. We rarely have snow on the ground without a thaw for this long.
How to make the time pass? One of the pleasure of life, of course, is a glass of wine with a bite of cheese, a fire, a good book, a good friend. Some of us are still maintaining the post-new year food modification regime, with success I might add. Wine is that little gift of the grape that often is cut out of diets due to calories (about 100 per four (4) ounces or 4 PointsPlus for the same amount if you are a Weight Watcher (who isn't?). This is a scant half glassful for a standard kitchen wine glass.
A solution that works for me is dilution with sparkling water. I can tolerate with grace one (1) ounce of wine and three (3) ounces of sparkling water or club soda with ease. See photo. It looks like you are having something, with some flavor and color, that definitely raises the spirit. If you prefer something non-alcoholic, do the same with cranberry juice or your favorite.
Before you laugh, give it a try. I've long preferred to eat my calories rather than drink them, but this isn't a bad trade off. Especially now since I can't eat so much either.
Make exceptions for rare vintages, your wedding, or other special occasions. But for the routine evening this substitute passes muster for many.
Stay tuned---
Homemade crackers and thin flat breads to follow--mostly made with ground chick-pea flours and meals.
KGC


 We have returned from a magical visit to the Big Island of Hawaii. February in Montana is quite a different scene! How fortunate to have a break from our longest and coldest winter in several years. Some say this year is more "normal." Everyone hopes that prediction is wrong....
At Kona we enjoyed making breakfast smoothies with local fruit. Our host offered bananas from her own garden. The pineapple patch wasn't quite in season, but you can see from the posted picture what a lovely addition to the landscape the plants make. We were satisfied with pineapples and various berries from the local farmer's market to fill out the ingredients.
Smoothies = LIQUID (juice or milk) + a SOLID (fruits in this example) + FLAVORINGS (dash of mint, cinnamon, cardamom). Depending on whether you are drinking one for refreshment, nutrition, or convenience, you can customize with ease to your heart's content. There are no rules!
Kona Smoothie
Plug in the blender and fill with liquids first, then fruits, then ice cubes:
2 cups fruit juice (we used a combo of mango and citrus)
2 small bananas picked in the yard & cut into chunks (see photo)
1/4 medium fresh pineapple, peeled, cored & cut into chunks
1/2 cup blueberries
1/2 cup strawberries
6-8 ice cubes (more if cubes are small)
Pulse in blender until smooth.
Serve in tall glasses with a sprig of mint, slice of citrus on the rim, dash of cinnamon.
Makes approximately 1 quart of drink.
Optional: Add 4 ounces of non-fat yogurt if you like it "creamy". Or ice cream is tasty if you aren't counting calories.
Feel free to experiment with what you have available. This is a great way to use seasonal fruits that may be too ripe to eat out-of-hand. You may also substitute frozen fruits with good success. For Weight Watchers-- fresh fruits are free points, and non-fat Greek yogurt is only 3 points per cup (8 oz).
A Yogurt Smoothie was my instant breakfast for years:
8 ounces Greek non-fat yogurt (1 cup)
1 standard size banana
Handful of frozen mixed berries (about 1/4 cup)
dash cinnamon
Whirl in blender and drink (right out of the blender if you like).
Add 2 tablespoons protein powder for extra nutrition.
What could be easier or more economical?
Keep warm,
KGC


 Join the fun at the snack table at all the weekend football game gatherings.
It is easy to have low calorie snacks that are also filling and nutritious!
Bring your own creations if you aren't the host--endless raw veggies without fattening dips you don't want to eat get pretty tiresome.
We remind readers that we have covered the sports snack topic before--please click back on July 5, 2010 for "Poor Man's Caviar", April 7, 2010 for "Oven Roasted Tofu", and February 6, 2010 for Michael's "Gazpacho" served in cocktail glasses. Most of these are fine just as they are, but for those of us watching our points and calories, today's post has some easy modifications. Mostly we omit the fats and oils and add some good seasonings.
Hummous Spread or Dip
Make with sesame oil and no sesame butter (tahini) to create a satisfying raw vegetable dip or crisp celery stuffing. It can be spread on crackers or scooped up with chips or strips if desired.
Place in the food processor (or heavy duty blender):
1 16 oz. can rinsed and drained garbanzo beans or 2 cups cooked ( 3 points per half cup)
2 cloves peeled fresh garlic (more if you love garlic)
2 Tablespoons sesame oil (1 point per teaspoon)
juice of 2 lemons
Pulse until creamy. If a little too coarse, add a tablespoon or two or water, stock or cooking liquid (if you cooked your own garbanzos). Pulse again and taste for salt. I also add ground white pepper and a teaspoon of smoky Paprika OR 1/4 teaspoon Chipotle ground chili or other smoky chili powder. Season to your taste. None add calories. Enjoy on crisp celery.
Yield about 2 cups or 18 points total. 1/4 cup serving = 2.5 points
Black Bean & Corn Salsa
Mix salsa in a 1 quart size container that will go right into the refrigerator. Eat a half cup often! It's very satisfying and helps keep us away from the cheesy snacks.
1 16-oz. can sweet corn (6 points)
1 16-oz. can black beans (6 points)
1 16-oz. can green beans (optional)
2 large cloves (or more) fresh garlic, split lengthwise and crushed
Juice of a lime (or substitute lemon)
1 cup good quality tomato juice OR 1/2 cup chopped canned tomatoes OR 2 whole fresh tomatoes, chopped, if they are in season
salt and pepper to taste
1 teaspoon ground cumin (optional, but very good)
chili powder or red chili flakes if heat is desired (optional)
Yield 4 cups salsa. Serving of 1 cup = 3 points (this is oil free)
Serve with an ounce of baked tortilla chips, or serve in a lettuce cup nestled inside a low cal whole wheat pita.
For those who will want a warm-up on a cold winter day--try this chowder served in a mug:
Manhattan (Red) Clam Chowder
Ingredients:
2 cups drained canned clams (1/2 cup clams = 2 points)
2 cups reserved clam juice
4 cups chicken or vegetable stock (de-fatted by chilling first if necessary)
1/2 cup tomato puree OR a can of tomatoes without seasoning OR fresh
1 large yellow or white onion, diced
3 Yukon gold (or any waxy potato) potatoes, cubed (3 oz. cooked potato = 2 points)
3 stalks celery, thinly sliced
1 teaspoon dry thyme or 2 sprigs fresh (traditional)
OR 1 teaspoon dry oregano or 2 sprigs fresh (variation)
2 bay leaves
salt, pepper
1 large clove garlic, pressed (optional)
1 teaspoon smoked Paprika (optional)
1/4 teaspoon Chipotle chili powder (optional, but very good)
Procedure:
Bring a quart of stock to a boil with bay leaves and add cubed potatoes. Simmer 10 minutes or until potatoes are just cooked. Lift potatoes out with a slotted spoon and set aside (so they don't overcook and fall apart).
Microwave diced onion in a shallow container with dusting of thyme or oregano. Add 2 tablespoons water, cover tightly with plastic wrap or a glass lid, and nuke for 3 minutes. See posting February 14, 2010 for no-fat microwave vegetable prep). When done, add to stock. They should be cooked and transparent, not browned.
Add the chopped celery and tomato puree to the stock. Simmer until celery is soft.
Just before serving, add back the cooked potatoes and bring to a boil. Add chopped clams, cover pot, and immediately turn off the heat. Canned clams are already cooked, so they just need heat. Let them rest with the stock and vegetables for at least 10 minutes, or up to 30 minutes to absorb flavors.
Serve in heated mugs (or bowls if guests have a place to sit) and offer chips or plain crackers or crusty rolls.
Yield about 2 quarts chowder. 1 cup serving = 4 points.
And may the best teams win........
KGC
 Welcome back!
Best wishes for a healthful, successful and peaceful New Year.
The second week of January is already upon us. Time flies.
Disclosure: I'm starting my fourth month of attending Weight Watchers. What's this? I have a modest goal that I want to reach by summer. It is often said that the last 20 pounds is the hardest to lose. True. True. True. That's where I remain as of January 8, 2011.
So, what to do? The KitchenGardenCook blog will keep focus on cooking locally and from the garden wherever possible. However it's winter in the heartland and we are under "no-grow" conditions until at least May. Unless you have a greenhouse, of course.
When my family moved to Montana from the California Bay Area in 1994, we determined to create a personal yard landscape that used native plants, but plants that created a coastal, semi- Mediterranean look. Russian Sage for Lavender, varieties of grapes that survive freezing temperatures, many evergreens and grasses, perennial herbs that could live indoors when necessary and so forth. We have been satisfied with the results.
Is it now time to consider modifying our cooking to fit with some of the Weight Watchers' ideals? The WW program is designed with a lot of flexibility--those who want packaged convenience foods can buy them, and those who don't (me) can make their own. You have to calculate "points" but it's easy with the new WW calculator. I still eat too much, even if what I eat is the "right stuff." WW advantage for me is obvious--almost all the fresh fruits and vegetables I want are included at low cost (WWpoints). The all-protein or its opposite, low- or no-fat schemes never worked for me. A combination of both works better, and science has proved it. Testimonials in the weekly group therapy sessions seem to support this. And there are more bodies in the door every week-- let's buy stock....
My weakness is bread and pasta. I come from a family of bakers. And pasta makers. These lovely items can be incorporated into the WW plan, if honestly counted. When I indulge, I have to eliminate the other carbs that day. Commercially processed packaged foods have no appeal for me--never did eat chips or other "sports" snacks or frozen entrees. I've made friends with only one "fake" product so far--diet mayo. Mixed with tuna or chicken it works from my mid-day protein salad. The fantastic calorie difference makes it well worth it.
OKAY--shall we continue on this direction? Please "weigh" in. I want to start converting my French cooking training (yes, Cordon Bleu, Paris 1984) into techniques and recipes that will be gorgeous to look at, great tasting, and more healthful.
Stay tuned!
Kitchen Garden Cook